Introduction to Record Components
What is a Record Component?
'Components' are elements that are attached to a record. The 'Title' and 'Dates' are examples of components. 'Photos' and 'URLs' are another type of components. Numerous components can be associated with a record.
The components are divided into groups, with each group shown in a separate subview. The content of each of these groups is described in the next sections.
Note: While a large number of components are possible, you are not required to enter a value for any of them. The application will specify a default value for all required components that were left undefined.
Note: All text components (e.g., record description, photo name, location name, etc.) cannot accept the double apostrophe (\") character. When typed into a text field, the application will replace that character with a single apostrophe (‘).
Main Components Subview
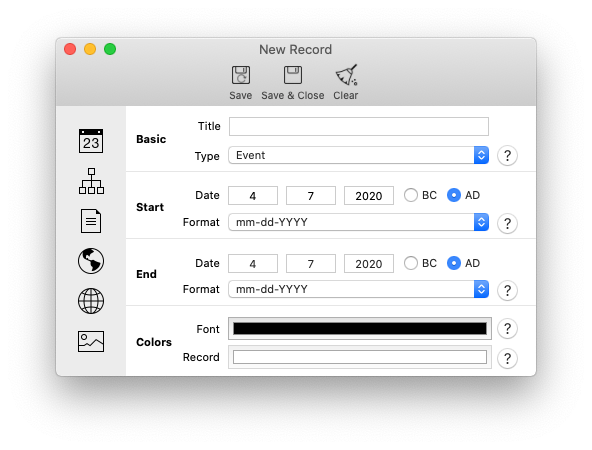
The Main Components Subview is shown in the next figure.
This subview contains the following record components:
-
Title: A text field that contains the title of the record.
Along with the dates, the title is the only visible field of a record in the Display View.
Titles are limited to 50 characters.
- Type: A record can be defined as an Event, a Note or a Heading.
- Event, which is the default selection, is used with records that are assigned to a specific event. The majority of the records will have that configuration. A Start Date and an End Dates are required for each Event record although both can have the same value.
-
Note is used with records that are intended to show information that is not date specific, but more like a 'note' in the timeline. Although a Start Date is required for a Note, that date will not be shown in the Display View and is used only to position the Note record in that view. The End Date for Note records is disabled and always made equal to the Start Date.
-
Heading is used with records that are designed to provide a visible separation or structuring of records. Although both the Start Date and the End Date are required with a Heading, neither is shown in the Display View. They are simply used to position the record and determine its length.
Headings have special characteristics unique to them:
-
All Headings are created as Parents by default (see Record Hierarchies for more information on Parents).
-
Headings with no visible children (based on the selected filters) are not shown. This behavior can be changed in the Configuration Panel.
-
The maximum length of a heading is determined by the difference between its Start Date and End Date. While no headings will be drawn longer than that length, a Heading can be drawn with a shorter length to adapt to the visible part of the timeline.
- Dates: Two dates are assigned to each record: a Start Date and an End Date. Both have to be entered with Events and Headings. Only the Start Date is required with Notes (the End Date will default to the Start Date automatically). The Start Date is used to position the record in the Display View. The difference between the Start Date and End Date defines the length of the record.
By default the app keeps the End Date equal to the Start Date until the End Date is modified, at which point the value of both dates become independent. However, if the Start Date is changed again and made later than the End Date (which is not a valid configuration), then the End Date value will be automated again and made equal to the Start Date.
- Date Format: Date Format is used to specify the level of details of the Record’s date. Some events are known to happen at a specific date. Others are less specific and might have happened sometimes during a month or during a year. Hence three formats are provided:
- mm-dd-YYY: The app will display the full date including the day, month and year. This is the default format
-
mm-YYYY: The app will display only the month and year.
-
YYYY: The app will display only the year
-
Colors: Two color fields are provided:
-
Font color which is the color used with the record Title, Dates and date lines.
-
Background color which is the color used for the record background. The Background color field is shown and used with Heading records only.
-
Extra Components Subview
The Extra Components Subview is shown in the next figure and contains a set of components that, while not important to the content of the record, help with managing and displaying that record.
This subview contains the following components:
-
Tags: Tags are text variables that are used to tag records mostly for identification and filtering purposes. Multiple tags can be used with a record. A filter is automatically created for each tag value used.
To add a Tag to the record, click on the '+' button. A Tag Management Window will appear in which you can create new tags or select one or many from the exiting one.
To remove a Tag from a record, select the Tag in the tags table and then click on the '-' button.
Note: A tag cannot contain non alphanumeric values or a space. Non alphanumeric values used with tags will be automatically removed by the app.
-
Level: By default, the application (tries) to display Heading records above Note records which are shown above Event records.
In some instances, that order might not be the desired one. Alternatively a group of Heading, Note and Event records are to be shown with no other interleaving records.
Level is an integer field (plus a string value for reference) that defines the 'row' (or the vertical position) in which a record is drawn. Records are then sorted using an ascending or descending order of the Level value (the order can be set in the Configuration Panel). For records with the same Level value, the default order is followed (i.e., Headings above Notes which are above Events).
As briefly mentioned in the previous section, a Level is defined with two parameters:
- A numeric value between 1 and 250 and have a default value of 25.
-
A string value that provides an easier reference to the level.
To set the Level value of a record you can select one from the exiting ones listed in the Level drop down field or you can create a new Level by clicking on the 'New' button. This will opens a window in which you can define the new level numeric and string values.
This short video tutorial shows how Levels can be used.
-
Hierarchy: The Hierarchy fields are used to specify whether a record is a Parent or a Child. Please refer to the 'Record Hierarchies' section for more details on this set of components.
Description Subview
The Description Subview is shown in the figure below.
This subview has a single component which is a text field used to enter the text describing the record. Any text of any length can be used.
The 'Clear' button at the bottom of the view will clear the content of the Description field.
Locations Subview
The Locations Subview is shown in the figure below.
This subview provides the fields that are necessary to enter specific locations associated with the record.
A map view is also provided to show the location on a map.
To enter a new location, click on the '+' button. A window will open in which will be asked to enter the latitude and longitude (in URI format) of the location plus a reference name.
To delete a location, just select that location in the view table then click on the '-' button.
You can edit a location by selecting it in the view table then clicking on the 'Edit' button.
Finally, clicking on the 'From list' button will open the Location Manager. The Location Manager lists all the locations that are already being used in the timeline. You can then select any location(s) from that list to add to the record.
The Location Manager is helpful when entering records that take place in the same region. So instead of having to enter manually the same location(s) to many records, you can now enter the location(s) once (the first time used) and then select the location(s) from the manager window when those have to be added to another record(s).
URL References Subview
The URL References Subview is shown in the figure below.
This subview provides the fields that are necessary to enter URLs that are of interest to the record.
To enter a new URL reference, click on the '+' button. A window will open in which we will be asked to enter the URL address as well as a name a name reference to that address.
Note: The name reference will default to the URL value is no value is entered in that field.
Note: The URL address has to start with http:// or https:// (http://istoriam.com). Shortened addresses (e.g., istoriam.com) will fail.
If the URL you want to enter is a local file, check the 'Local file' checkbox. A 'Browse' button will appear. Clicking on that button will open the standard file panel from which you can select the file to add.
Note: Access to local files is controlled by Apple's sandbox operations. Check the section about operating with Sandbox for more details.
To delete a URL, select that URL from the view table and click on the '-' button.
To edit a record, select that URL from the view table and click on the 'Edit' button.
You can double-click on the URL itself or select it and then click on the 'Go to the Site' button to open the URL file (local file) or website.
Photos Subview
The Photos Subview is shown in the next figure.
This subview provides the fields that are necessary to attach photos to a record.
To add a new photo click on the '+' button. A window will open from which you can browse your photo albums and select the desired photo or picture. You can edit the photo name by clicking on the pen icon.
To delete a photo, select the photo from the view table and click on the '-' button.
To edit a photo, select the photo from the view table and click on the 'edit' button.
The Photo Subview contain a space where the photo will be displayed. You can open the photo in a separate and larger window by clicking on the 'Enlarge' button.
If you are using iCloud, the size of the photo (especially if you have more than one attached to the record) might result in the record exceeding the allowed size by Apple. When that is the case, you can use the compress feature on that subview to compress the size of the record.