Managing Records
Adding a Record
To add a record, you can
-
Click on the 'Add' icon on the Toolbar of the Display Window
-
Select the 'Add Record' submenu option under the “Records” menu option.
-
Using the fast-key combination of Shift-Cmnd-A
You can also add a child to a parent record. When a record is a Parent record (see 'Parent Record'), you can right click on the record itself and then select 'Add a child' from the displayed menu.
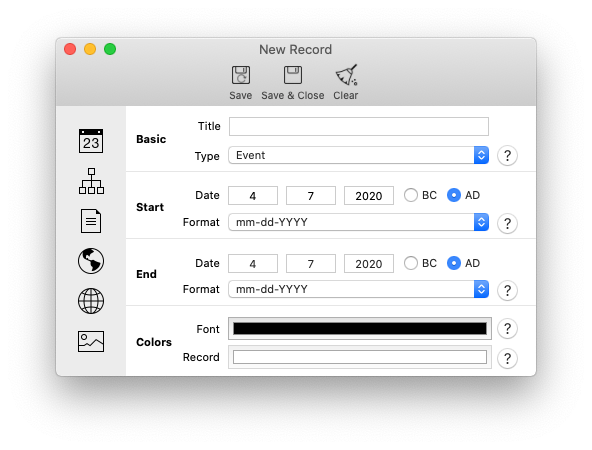
All the aforementioned options will open the Record Components Window (shown below), where you can enter the different components of the record (see 'Record Components Window' for a description of this window).
All components of the record are optional (the app will add a default value for each when one is needed). Enter only the components that are relevant to your record. Once all those components are entered, tap on the 'Save' icon to save the record. After saving the record, all the fields will clear. At this point you can either enter the components of another record or close the window.
If you prefer to close the window automatically after saving the record, click on the 'Save & Close' icon instead.
Note that you cannot do intermediate savings of a record, i.e., once you tapped on the 'Save' icon, the record is saved and the form is cleared.
Editing a Record
You have five options to edit a record. You can:
-
Double-click (left mouse) on the record itself
-
Select the record then click on the 'Edit' icon on the Toolbar
-
Select the record then choose the 'Edit Record' menu option under the 'Records' menu list
-
Select the record then use the fast-key Shift-Cmnd-E).
-
Right-click on the record then select the option 'Edit' from the displayed menu.
When you select the edit a record, the Record Components Window will appear. The fields of the window will be populated with the components of the edited record. At this point you can modify, remove, or add any of the components. Once you have done the necessary changes, save the record.
Note: You can only edit the records that you have created. You will not be able to edit records from imported Pre-Built Timelines.
Note: You can edit records in bulk by using the Editor tool. See 'Working with the Editor' from more details.
Duplicating a Record
Sometimes you need to create a set of records with little changes between each one. For that, you can start by creating a base record then duplicating it as many time as needed. When duplicating a record, the whole of the original record is duplicated into a new record (with “-copy” appended to the title of the original record). You can then edit the duplicated copy and make the necessary modifications to that record.
Four ways are provided to duplicate a record:
-
Select the record then click on the 'Duplicate' icon on the Toolbar
-
Select the record then select the 'Duplicate' menu item from the 'Records' menu list
-
Select the record then use the fast-key Shift-Cmnd-U
-
Right-click on the record then select the option 'Duplicate' from the displayed menu
Note: When duplicating a Parent record, only the Parent record is duplicate but none of its children. The duplicated record will still be tagged with the Parent flag.
Note: You can only duplicate the records that you have created. You will not be able to duplicate records from imported Pre-Built Timelines.
Deleting a Record
Some of the created records will have occasionally to be deleted.
Four ways are provided to delete a record:
-
Select the record then click on the 'Delete' icon on the Toolbar
-
Select the record then select the 'Delete menu option from the 'Records' menu list
-
Select the record then use the fast-key Shift-Cmnd-D
-
Right-click on the record then select the option 'Delete' from the displayed menu
Special care should be made when deleting a record that has a Parent status as it impacts the links to its children's records.
When deleting a record that has a Parent status, you will be given the option of deleting only the Parent record (and removing the links to its children) or deleting the Parent record with all its children. The latter call is recursive in the sense that children of children will be deleted until the whole hierarchy of records is deleted.
Note: You can delete only the records that you have created. You will not be able to delete the records from imported Pre-Built Timelines.
Marking a record
Occasionally, as you add new records to your timelines or edit existing ones, you have the need to keep going back to one or more records in the timelines. Occasionally too, you might have records in the timeline that needs more work or are missing some information.
You can mark those records and go back to them as needed.
To Mark a record, right click on the record and select 'Mark' from the drop down menu. A small flag will now appear next to the record to indicate that it is marked.
To Unmark a marked record, right click again on the record and select 'Unmark' from the drop down menu.
To go to a marked record, open the 'Marked Record' window under the 'Window' menu option. A window will open with a list of all the marked records. Select the record you want the display to move to and then click on 'Go There' button. The display window will then scroll and center on the selected record.
Searching for Records
Besides filtering, the app provides a mechanism to search for records with 'Attributes' that satisfy a specified 'Value'. The searchable attributes are:
- Title: the Title of the record contains the specified text.
-
Level: the Level of the record is equal to the specified value.
-
Tag: one of the Tags of the record is equal to the specified value.
To search for records with a specific 'Attribute' value, start by selecting the desired attribute from the drop-down 'Attribute' field, then specify the desired value in the adjacent 'Value' field. Records that satisfy the entered values will be highlighted. The remaining records will be dimmed.
Clear the search field to cancel the search and return to the regular display of the records.
Expanding and Collapsing Records
A Parent record that has one or more children will be displayed with a red triangle next to it. The triangle will not be displayed if the record has no children even if it is configured to be a Parent.
Parent records with children can be expanded to show their children or collapsed to hide them (see the 'Record Hierarchy' section for more details on record hierarchy).
To expand or collapse a Parent record, right click on the red triangle next to the record date. If the record has children and those are collapsed (hidden), the children records will become visible under their parent (which is then considered expanded). Conversely, if the Parent record is expanded with visible children, the latter are then hidden (which change the status of the parent record to collapsed).
Alternatively you can expand or collapse a Parent record by right clicking on it and selecting the desired option from the displayed menu.
A Parent with expanded children will display the triangle pointing downward. Conversely, a Parent with collapsed children will display the triangle pointing upward.
A complex timeline will have numerous parents with multiple levels of hierarchies. The application provides means to expand all records (which will display all the records that satisfy the last executed filter) or to collapse all records (in which case all the children records will be hidden). Both of those features are available under the “Record” menu list.
Viewing the Components of a Record
Records with non-default components are displayed with a set of icons next to their title as shown in the figure below, where the George Washington record has 4 icons next to it (plus the red triangle for expanding or collapsing the Children records. See 'Expanding and Collapsing Records')
Right clicking on the icon will show the value of that record components in a popover window.
Four icons are used:
-
The 'Paper' icon indicates that the record has a Description text as shown in the figure below.
-
The 'World Globe' icon indicates that the record has a set of Locations as shown in the figure below.
-
The 'Camera' icon indicates that the record has a set of Photos as shown in the figure below.
-
The 'Meshed Globe' icon indicates that the record has a set of URL links as shown in the figure below.